- /
- /
- /
Delete version history in SharePoint Online / Office 365
Versioning is one of the primary features of a Document Management System. SharePoint offers these capabilities in Document Libraries, allowing users to update documents and create multiple document versions. This consequently generates enormous amounts of data. As a result, it can happen very quickly that a Document Library in SharePoint Online or OneDrive consumes many gigabytes of storage space. Therefore, to solve this problem, administrators of the site try to delete old document versions.
However, if you want to clean up the version history for the entire site, including the sub- sites or only for a number of libraries, you need to do a lot of manual work.
DMS-Shuttle can help you to accomplish this task. The feature “Bulk delete version history” allows you to delete old versions of documents inside a selected structure and leave only the current versions or a defined number of the latest versions. This feature works also for Document Libraries with more than 5000 documents.
Possible Use Cases for Deleting Version History in SharePoint
The tool offers the following options to delete old versions in SharePoint, helping optimize storage and improve performance.
Use it to clean up version history for:
- All Sites in a SharePoint Tenant
Manage version history across your entire organization (requires Global Admin access). - Entire SharePoint Sites (Including Sub-Sites and Libraries)
Remove version history from the main site, all sub-sites, and associated document libraries in one go. - Specific Document Libraries
Select one or multiple libraries to clear their old versions selectively. - Folders and Subfolders
Target specific folders or subfolders to delete old versions without affecting the rest of the library. - Individual Documents or Multiple Documents
Clean up old versions for specific files, whether it’s a single document or a batch of selected documents.
How it works
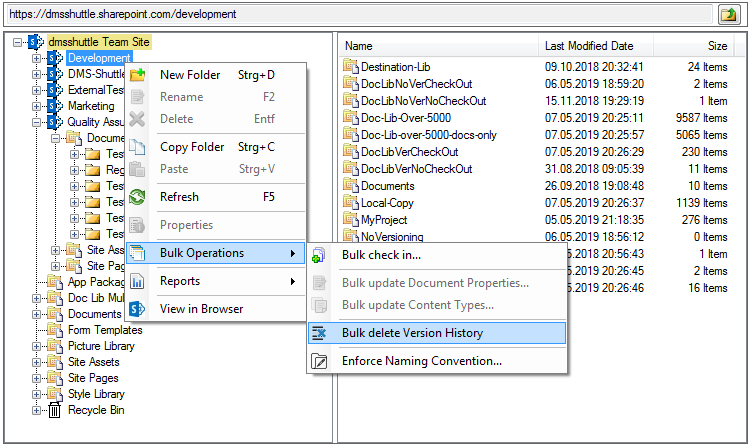
1. Select a Site, Document Library or folder and perform the operation “Bulk delete Version History” (per right mouse click and selection in context menu).

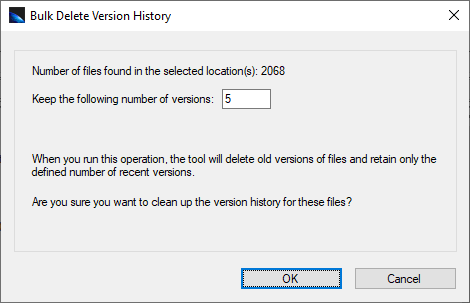
2. After that, the tool collects all versioned files (if there are any inside the selected structure) and displays a confirmation dialog. In this dialog the user can define the number of latest versions to be kept.

3. In conclusion, hit the “OK” button to complete or “Cancel” to abort the Operation.
4. During the execution of the operation the tool displays a Progress Dialog. In Addition, the user can see information about processed files within the Session Log View in the user interface.

Advanced Mode
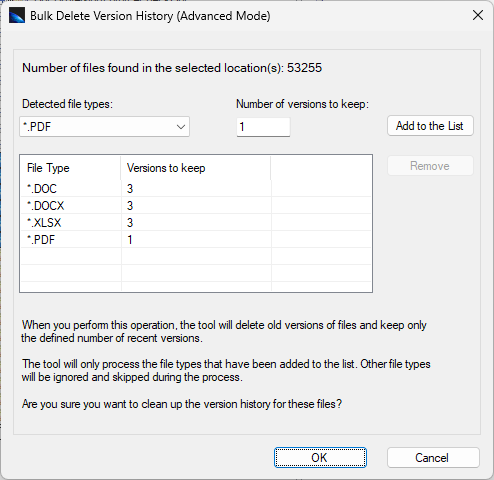
You have the option to enable the “Advanced Mode,” which permits you to selectively remove outdated versions of specific file types. Any file types not included in the list will be disregarded and excluded from the deletion process.
You can specify how many versions to keep for each file type.

Note: This mode is disabled by default and can be enabled in the Settings Wizard.
Steps to activate this mode: Setting Wizard >> Advanced Settings >> Bulk Delete Versions History / enable Advanced Mode
Get 15 days free Trial Version